document.pdf
from page
to
ADD IMAGE
✓ Watermark image loaded
from page
to
Add watermark
from page
to
Add text or image watermarks to your PDF documents with customizable position, transparency, and formatting
Drop PDF file here or click to browse
Supports PDF files up to 50MB
ADD IMAGE
✓ Watermark image loaded
Adding watermark to your PDF...
This may take a moment depending on your PDF size.
Upload your PDF, type your watermark text, choose position with a simple 3×3 grid, set transparency and rotation, then click Add watermark to download a clean, readable, watermarked PDF. Everything runs privately in your browser.
This tool lets you add text watermarks to PDFs in seconds with full control over look and placement. You can anchor text anywhere on the page, set transparency, pick a font and size, rotate at an angle, and apply the mark to exact page ranges. Because processing happens locally in your browser, sensitive documents never leave your device. It’s quick, private, and reliable for daily publishing tasks.
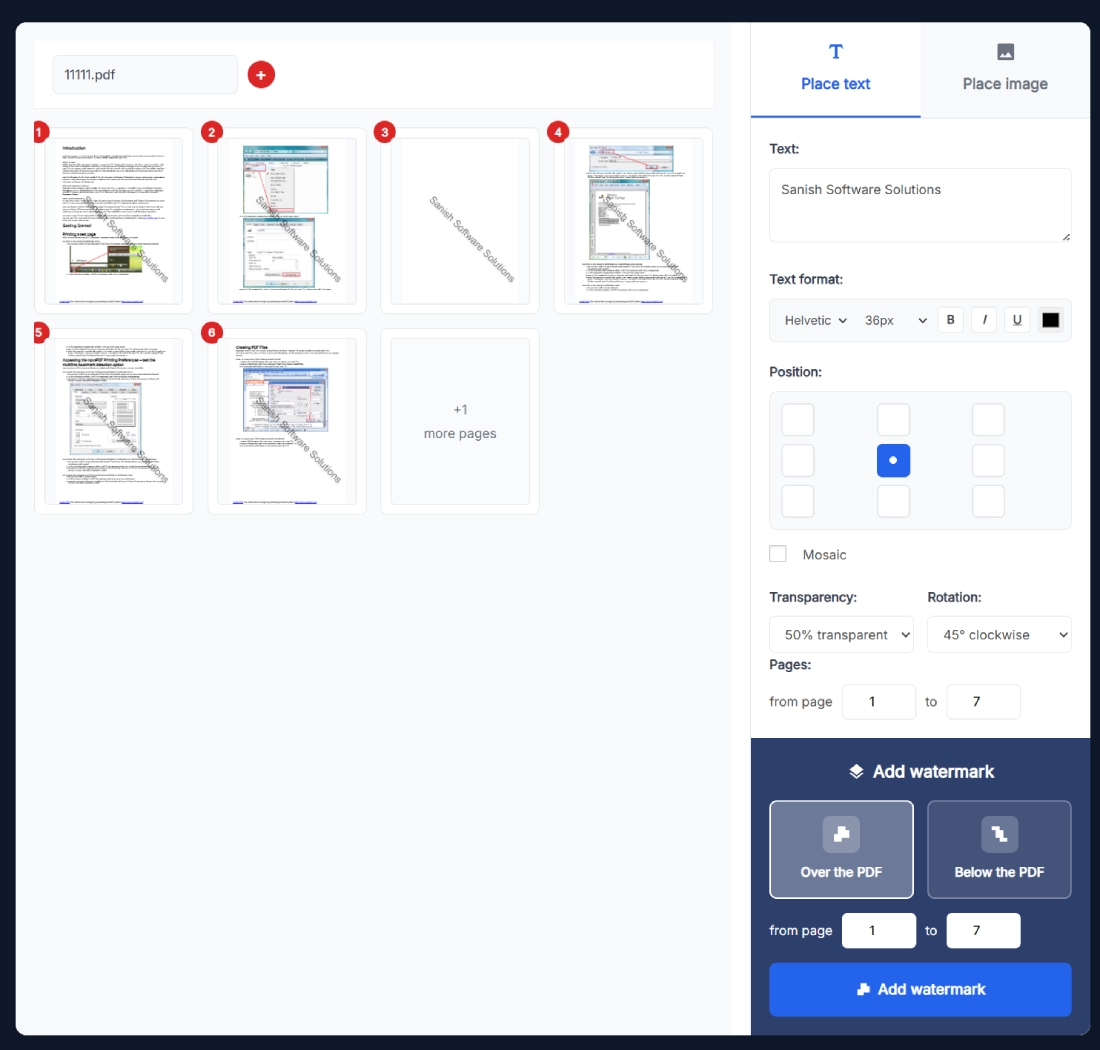
The UI is split into two clear zones. On the left, a thumbnail preview grid shows each page. On the right, a focused control panel includes tabs for Place text and Place image, a text input, text formatting controls, a 3×3 position grid, optional Mosaic tiling, transparency presets, a rotation dropdown, page range selectors, and the Add watermark area with Over the PDF or Below the PDF stacking plus the primary Add watermark button.
You’ll recognize everything at a glance, and setup takes less than a minute. Follow this sequence to mirror the screenshots and get predictable results every time.
If a page looks too busy, tweak transparency or position and apply again. Every change is quick because the tool works locally in your browser.
The result is a clean PDF where your message is visible yet respectful of layout and typography. It looks intentional, not improvised.
Here’s a setup many teams use. You have a 40 page policy document in review. You want DRAFT across pages 2 through 12. Type DRAFT in the text field, choose Helvetica 36px, bold on, medium gray color. Click the center cell in the 3×3 grid, set transparency to 50 percent, rotation to 45° clockwise, and choose Below the PDF. Enter the page range 2 to 12, then click Add watermark. The success block appears, and Download Watermarked PDF gives you a readable draft with a clear diagonal mark.
Speed up your publishing workflow with these companion tools from SanishTech:
Merge before watermarking, rotate pages that were scanned sideways, and compress after you are done so email delivery stays smooth.
No. Everything runs locally in your browser. Your PDF never leaves your device, which means you can watermark confidential contracts and classroom packs without exposure. It is also faster because the tool skips network transfers. When you finish, close the tab to end the session and clear memory on your side.
Yes. The left side thumbnail grid mirrors your settings. You’ll see where the text lands, the angle you chose, and a sense of contrast. If anything looks off, change transparency, rotation, or position, then click Add watermark again. This short loop helps you dial in a readable, consistent result.
Sans-serif fonts like Helvetica read well at modest sizes. For A4 and Letter pages, 28 to 40 px is a practical range. If your page is very dense, aim lower and increase transparency. If the page is image heavy, go a touch larger and keep contrast steady with a mid gray color.
Over the PDF puts the mark on top of content for strong visibility. Below the PDF places it behind text and images, which feels softer and often suits long reading. For review copies, Below the PDF at 50 percent transparency is a popular balance of presence and comfort.
Use the from page and to page fields to target a subset. For example, apply the watermark to pages 2 through 12 while leaving the cover and index clean. You can repeat the process for other sections with different text or styles if you need separate labels for appendix or annex pages.
Yes. Enable Mosaic to tile the text across the page. This is useful when you share sample data or training decks and want to discourage reuse. Combine Mosaic with lower transparency so body text remains comfortable to read, especially on long policy documents or handbooks.
No. The watermark is applied as added text rendering. Your original links, bookmarks, and selectable text remain intact. The tool focuses only on placement, appearance, and range, so your document’s structure and navigation stay unchanged after processing.
A 45° clockwise angle is a dependable choice. It crosses the reading path enough to be noticed without blocking paragraphs. If you prefer a softer feel, try 30°. For short one-page notices, a vertical placement can work, but test it in the preview grid to confirm legibility.
Use medium gray, keep transparency around 40 to 60 percent, and avoid stacking over dark photos. Place at center or bottom right for consistency. If a page is very busy, select Below the PDF so the text integrates with content rather than fighting it.
Yes. Add a text watermark first, download, then run the file through the image watermark tool to place a logo. You can also work in reverse. The key is to keep transparency and size balanced so neither element overwhelms the page. For logos, a subtle gray or brand color works nicely.
Add Text Watermark to PDF Tool keeps your files local, your workflow fast, and your pages tidy. Try the DRAFT example, then tailor font, angle, and transparency for your brand or course. When your mark looks right in the grid, click Add watermark and download. That’s all it takes to ship a professional, protected PDF.